
Few kitchen skills deliver more value than learning how to make chicken stock. A single batch can transform soups, sauces, gravies, rice dishes, and stews. Homemade stock has a deeper flavor, better texture, and fewer additives than most store-bought options.
The best part? You don’t need expensive ingredients. Leftover chicken bones, vegetable scraps, water, and a few herbs are enough to create a rich, golden stock.
Professional chefs rely on homemade stock because it creates a stronger foundation for recipes. Once you learn the process, you’ll likely keep a container in your freezer all year.
This guide explains every step, from choosing the right ingredients to simmering, straining, storing, and using your finished stock.
Why Homemade Chicken Stock Is Better
Store-bought chicken broth certainly saves time, but homemade stock offers several advantages.
It delivers a cleaner, richer chicken flavor without excessive sodium or preservatives. You also control every ingredient, making it easy to avoid unnecessary additives.
Making stock is also a great way to reduce food waste. Instead of throwing away chicken bones and vegetable scraps, you can turn them into something valuable.
Benefits include:
- Richer natural flavor
- Better body from natural collagen
- Lower sodium
- No artificial preservatives
- Budget-friendly
- Reduces kitchen waste
- Freezes well for future meals
Many cooks say homemade stock becomes their secret ingredient for restaurant-quality meals.
Understanding Chicken Stock vs. Chicken Broth
Many people use the terms interchangeably, but they are different.
| Feature | Chicken Stock | Chicken Broth |
|---|---|---|
| Main Ingredient | Bones | Meat |
| Texture | Rich and silky | Lighter |
| Cooking Time | 3–6 hours | 1–2 hours |
| Collagen | High | Lower |
| Best Uses | Soups, sauces, gravies | Drinking, soups |
Stock gets its rich texture from collagen released by bones during long, slow cooking.
When chilled, properly made stock often turns into a soft gel. That’s a sign of excellent quality—not spoilage.
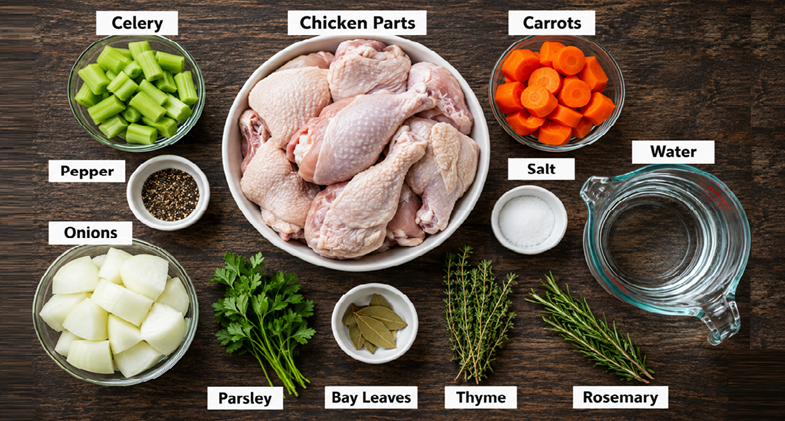
Ingredients You’ll Need
Making delicious chicken stock requires only a handful of fresh ingredients.
1.Chicken Bones
Bones provide collagen, minerals, and deep flavor.
Great options include:
- Leftover roasted chicken carcasses
- Raw chicken backs
- Chicken necks
- Wings
- Drumstick bones
- Whole chicken frames
Roasted bones create a darker, richer stock with a deeper taste.
Raw bones produce a lighter, cleaner flavor that’s perfect for delicate soups.
2.Vegetables
Classic stock begins with aromatic vegetables.
Use:
- 2 onions
- 2 carrots
- 2 celery stalks
This combination is known as mirepoix, the traditional base for many classic soups and sauces.
There’s no need to peel everything perfectly. Simply wash the vegetables well and chop them into large pieces.
Avoid using too many carrots, which can make the stock overly sweet.
3.Herbs and Aromatics
Simple seasonings create balanced flavor.
Popular choices include:
- Bay leaves
- Fresh parsley stems
- Thyme
- Black peppercorns
- Garlic cloves
Avoid overpowering herbs like rosemary unless you want a very specific flavor profile.
4.Water
Use cold, fresh water.
Cold water helps draw flavor and collagen gradually from the bones during cooking.
Cover the ingredients by about one to two inches.
5.Should You Add Salt?
Most professional chefs recommend not adding salt while making stock.
Stock often gets reduced later in recipes. If it’s already salty, the finished dish can become over-seasoned.
Instead, season individual recipes when you cook with the stock.
Kitchen Equipment You’ll Need
Fortunately, special equipment isn’t necessary.
You’ll need:
- Large stockpot (8–12 quarts)
- Fine mesh strainer
- Large spoon
- Tongs
- Storage containers
- Measuring cups
Optional equipment includes:
- Cheesecloth
- Fat separator
- Slow cooker
- Pressure cooker
- Instant-read thermometer
Step-by-Step: How to Make Chicken Stock
Making chicken stock isn’t difficult. Most of the cooking time is completely hands-off.
Step 1: Prepare the Bones
If you’re using leftover roasted chicken, remove any large pieces of meat.
Small bits of meat are perfectly fine.
For raw bones, rinse only if necessary according to your preference and local food safety practices. Pat them dry before using.
For even deeper flavor, roast raw bones first.
Spread them on a baking sheet and roast at 425°F for about 35 to 45 minutes, turning them halfway through.
Roasting creates rich caramelized flavors that produce a darker stock.
Step 2: Prepare the Vegetables
Roughly chop:
- Onions
- Carrots
- Celery
The pieces don’t need to be uniform.
Large chunks work perfectly because they’ll simmer for several hours.
There’s no need to dice vegetables finely.
Step 3: Combine Everything
Place the bones in your stockpot.
Add:
- Vegetables
- Garlic
- Bay leaves
- Peppercorns
- Fresh herbs
Pour in enough cold water to cover everything by one to two inches.
Don’t overfill the pot. Leaving a little space helps prevent boiling over.
Step 4: Bring to a Gentle Simmer
Heat the pot over medium-high heat until tiny bubbles begin to appear.
Avoid a rolling boil.
Instead, reduce the heat to maintain a gentle simmer.
This is one of the most important steps.
A vigorous boil breaks apart fat and impurities, creating a cloudy stock. A slow simmer keeps the liquid clearer while allowing flavors to develop gradually.
Step 5: Skim the Surface
During the first 30 to 45 minutes, foam and impurities may rise to the top.
Use a large spoon or fine skimmer to remove this layer.
You don’t need to skim constantly.
Once the initial foam disappears, the stock can simmer undisturbed.
Removing these impurities helps create a cleaner taste and a clearer finished stock.
Step 6: Let the Stock Simmer
Patience is the key to exceptional homemade chicken stock.
A long, gentle simmer allows collagen, minerals, and savory flavors to slowly infuse into the liquid.
General cooking times:
- Chicken carcasses: 3–4 hours
- Raw chicken bones: 4–6 hours
- Chicken wings and backs: 3–5 hours
Keep the heat low enough that you see only occasional bubbles breaking the surface. If too much water evaporates, add a little hot water to keep the bones submerged.
By the end of this stage, your kitchen will smell rich and comforting, and the liquid will have developed a deep golden color with a full-bodied aroma.
Step 7: Strain the Stock
Once the stock has finished simmering, remove the pot from the heat.
Use tongs to lift out the large bones and vegetables. Then pour the liquid through a fine-mesh strainer into a large bowl or another pot.
For exceptionally clear stock, line the strainer with cheesecloth before pouring. This extra step catches tiny particles that can make the stock cloudy.
Discard the cooked bones and vegetables. After several hours of simmering, they’ve released nearly all of their flavor and nutrients.
Step 8: Cool the Stock Safely
Proper cooling is just as important as proper cooking.
Never leave a large pot of hot stock on the counter for several hours. Warm temperatures encourage bacterial growth.
Instead, use one of these methods:
- Divide the stock into smaller containers.
- Place the pot in an ice-water bath.
- Stir occasionally to help release heat faster.
Once the stock reaches room temperature, refrigerate it promptly.
Food safety experts recommend refrigerating homemade stock within two hours of cooking.
Step 9: Remove the Fat (Optional)
After several hours in the refrigerator, a layer of fat will rise and harden on top.
You can simply lift it off with a spoon.
Some cooks save this rendered chicken fat—often called schmaltz—for roasting vegetables, frying potatoes, or adding flavor to savory dishes.
Leaving a small amount of fat in the stock is also perfectly fine if you prefer a richer taste.
How to Store Homemade Chicken Stock
One batch of homemade stock can last for multiple meals if stored correctly.
In the Refrigerator
Store cooled stock in airtight containers.
It stays fresh for 3 to 4 days.
Label each container with the date so you know when to use it.
In the Freezer
Freezing is the best option for long-term storage.
Homemade chicken stock keeps well for 4 to 6 months without losing much quality.
Freeze it in:
- Quart containers
- Pint containers
- Mason jars (leave headspace)
- Silicone freezer trays
- Ice cube trays
Frozen stock cubes work well when recipes only need a few tablespoons.
Signs Your Chicken Stock Has Gone Bad
Fresh homemade stock has a mild, savory aroma.
Discard it if you notice:
- A sour smell
- Mold
- Slimy texture
- Bubbling without reheating
- Strange discoloration
When in doubt, throw it out.
Delicious Ways to Use Chicken Stock
Once you learn how to make chicken stock, you’ll find endless uses for it.
Popular recipes include:
- Chicken noodle soup
- Vegetable soup
- Creamy potato soup
- Risotto
- Gravy
- Pan sauces
- Rice
- Quinoa
- Stuffing
- Braised chicken
- Mashed potatoes
You can even sip warm chicken stock with herbs during cold weather for a comforting drink.
Flavor Variations
Classic chicken stock is incredibly versatile, but you can customize it to suit different recipes.
Roasted Chicken Stock
Roast both the chicken bones and vegetables before simmering.
This creates:
- Darker color
- Richer flavor
- Deeper aroma
It’s perfect for gravies and hearty soups.
Herb Chicken Stock
Add fresh herbs such as:
- Parsley
- Thyme
- Sage
Use this version for lighter soups and roasted poultry dishes.
Asian-Inspired Chicken Stock
For noodle soups and stir-fries, consider adding:
- Fresh ginger
- Garlic
- Green onions
- A small piece of dried mushroom
Avoid soy sauce during stock preparation. Add it later when preparing your final dish.
Vegetable-Forward Stock
Increase the amount of celery, carrots, and onions for a slightly sweeter stock that works well in vegetable soups.
Keep the vegetables balanced so they don’t overpower the chicken flavor.
Common Mistakes to Avoid
Even experienced home cooks can make simple mistakes that affect the final result.
Boiling Instead of Simmering
A vigorous boil emulsifies fat into the liquid, making the stock cloudy.
A gentle simmer produces cleaner flavor and better clarity.
Using Too Much Water
Adding excessive water dilutes the flavor.
The bones should remain covered, but avoid filling the pot unnecessarily.
Adding Too Many Vegetables
Vegetables should support the chicken—not dominate it.
Stick to a balanced ratio of onions, carrots, and celery.
Seasoning Too Early
Adding salt during stock preparation limits its flexibility.
Unsalted stock works better because recipes can be seasoned individually.
Skipping the Skimming
Removing foam during the first hour helps create cleaner-tasting stock.
Although not absolutely required, it improves the finished product.
Cooking Too Briefly
Collagen needs time to break down.
Rushing the process produces weaker flavor and thinner texture.
Expert Tips for Better Chicken Stock
Professional chefs rely on a few simple techniques that consistently improve homemade stock.
Start With Cold Water
Cold water gradually extracts proteins, collagen, and flavor from the bones.
Roast Bones for Richer Flavor
Roasting creates caramelization, giving the stock a deeper, more complex taste.
Keep the Lid Slightly Open
Leaving the lid partially uncovered allows gentle evaporation, naturally concentrating flavor.
Don’t Stir Constantly
Frequent stirring clouds the liquid.
Once the stock reaches a steady simmer, leave it mostly undisturbed.
Use Leftover Chicken Wisely
Save bones from:
- Rotisserie chicken
- Roast chicken
- Grilled chicken
- Holiday dinners
Store them in freezer bags until you have enough for a full batch.
Freeze in Small Portions
Small portions thaw faster and reduce waste.
One-cup servings work well for most recipes.
Pros and Cons of Homemade Chicken Stock
| Pros | Cons |
|---|---|
| Rich, natural flavor | Takes several hours to prepare |
| Budget-friendly | Requires freezer or refrigerator space |
| Lower sodium | Needs time to cool safely |
| No preservatives | Requires straining |
| Reduces food waste | Slightly more effort than store-bought |
| High in natural collagen | Large batches need storage containers |
Nutrition Overview
The exact nutrition depends on the ingredients used and whether fat is removed.
In general, one cup of homemade chicken stock contains approximately:
| Nutrient | Approximate Amount |
|---|---|
| Calories | 15–40 |
| Protein | 3–8 g |
| Fat | 0–2 g (after skimming) |
| Carbohydrates | Less than 1 g |
| Sodium | Very low (if unsalted) |
Because homemade stock is naturally low in sodium, it’s an excellent base for heart-conscious cooking. It also provides gelatin derived from collagen, which contributes to its silky texture and mouthfeel.
Why Homemade Chicken Stock Is Worth the Effort
Making chicken stock requires patience, but very little hands-on work.
With a few inexpensive ingredients and leftover bones, you can prepare a flavorful kitchen staple that outperforms many boxed varieties.
Whether you’re making a simple weeknight soup or a holiday gravy, homemade stock provides a richer foundation. Once you taste the difference, it’s easy to see why so many home cooks keep a batch in the freezer year-round.
(FAQs)
1. How long should you simmer chicken stock?
For the best flavor, simmer chicken stock for 3 to 6 hours over low heat. Roasted bones usually produce excellent results in about 4 hours, while raw bones may benefit from a longer cooking time. Avoid boiling, as it can make the stock cloudy.
2. Can you make chicken stock in a slow cooker?
Yes. A slow cooker is one of the easiest ways to make chicken stock.
Add the bones, vegetables, herbs, and cold water. Cook on Low for 10 to 12 hours or High for 5 to 6 hours. The slow, steady heat extracts plenty of flavor without requiring much attention.
3. Can you make chicken stock in an Instant Pot?
Absolutely.
A pressure cooker significantly reduces cooking time while producing rich stock. Cook on High Pressure for 45 to 60 minutes, then allow the pressure to release naturally for the best results.
4. Why did my chicken stock turn into jelly?
That’s actually a good sign.
Homemade chicken stock often becomes jelly-like after refrigeration because collagen from the bones turns into natural gelatin. Once reheated, it returns to a liquid state.
5. Can you reuse chicken bones for another batch?
You can, but the second batch will be much weaker.
Most of the collagen and flavor are extracted during the first simmer. If you reuse the bones, expect a lighter stock that’s better suited for simple soups or cooking grains.
6. What’s the difference between bone broth and chicken stock?
Although many people use the terms interchangeably, they are prepared differently.
Chicken stock typically cooks for 3 to 6 hours and uses bones, vegetables, and herbs. Bone broth usually simmers much longer, often 12 to 24 hours, to extract additional collagen and minerals. Bone broth is also commonly enjoyed as a beverage.
7. Can you freeze homemade chicken stock?
Yes.
Homemade chicken stock freezes very well for 4 to 6 months. Freeze it in small portions so you can thaw only what you need for a recipe.
8. Should chicken stock be seasoned with salt?
It’s best not to add salt while making stock.
Leaving it unsalted gives you more flexibility because different recipes require different seasoning levels. You can always add salt when preparing the final dish.
9. Can you drink chicken stock by itself?
Yes.
Many people enjoy warm chicken stock as a light, comforting drink. Add fresh herbs, black pepper, or a squeeze of lemon juice for extra flavor.
10. What recipes benefit most from homemade chicken stock?
Homemade chicken stock improves the flavor of countless dishes, including:
- Chicken noodle soup
- Creamy soups
- Risotto
- Rice pilaf
- Pan sauces
- Gravy
- Braised chicken
- Stuffing
- Mashed potatoes
- Slow-cooked stews
Its rich flavor makes it one of the most versatile ingredients in any kitchen.
Common Questions at a Glance
| Question | Quick Answer |
|---|---|
| How long does homemade chicken stock last in the refrigerator? | 3–4 days |
| How long does frozen stock last? | 4–6 months |
| Can I use rotisserie chicken bones? | Yes |
| Should I salt the stock? | No, season later |
| Why is my stock cloudy? | It likely boiled instead of simmered |
| Why is it gelatinous? | Natural collagen from the bones |
| Can I freeze it in ice cube trays? | Yes |
| Is homemade stock healthier than store-bought? | Often yes, especially if made without added sodium |
Final Thoughts
Learning how to make chicken stock is one of the most valuable cooking skills you can develop. It requires only a few simple ingredients, yet it delivers a depth of flavor that packaged alternatives rarely match.
Homemade chicken stock is economical, versatile, and easy to customize. Whether you’re preparing soups, sauces, gravies, or grain dishes, a well-made stock provides a rich foundation that elevates every recipe.
With the techniques outlined in this guide—choosing quality ingredients, maintaining a gentle simmer, cooling the stock safely, and storing it properly—you can confidently make flavorful chicken stock whenever you need it.